A virtual private network (VPN) is a tool that encrypts your internet data and disguises your IP address, allowing you to privately browse the internet. It’s a useful tool for those worried about their data privacy and for businesses needing to encrypt data and set up a secure connection between their intranet platforms.
VPN companies have advertisements everywhere promoting these tools, but you don’t need to buy an expensive plan to use a VPN.
8 Steps to Create a VPN for Free
- Set up the server
- Install OpenVPN and Easy-RSA
- Configure server certificates and keys
- Set up the server configuration.
- Enable IP forwarding
- Configure firewall
- Configure the client
- Connect to the VPN
Here’s how you can build your own:
8 Steps to Create Your Own VPN
1. Set Up the Server
For ease of use, a Linux server at your disposal would be ideal. On there, log in using SSH. If you don’t have one, services like AWS, Google Cloud or DigitalOcean offer free tiers that you can use for this purpose.
ssh username@server_ip
Replace “username” with the actual username you use to log into your server.
Replace “server_ip” with the IP address of your server. If you are using a cloud service, look in the server dashboard.
2. Install OpenVPN and Easy-RSA
OpenVPN is going to be our free VPN solution, and I will show you how it supports various encryption protocols. Let’s install it:
    sudo apt update
    sudo apt install openvpn
Download easy-rsa:
    sudo apt-get update
    sudo apt-get install easy-rsa
3. Configure Server Certificates and Keys
Generate the server’s certificates and keys:
    cd /usr/share/easy-rsa
    sudo ./easyrsa init-pki
    sudo ./easyrsa build-ca
    sudo ./easyrsa gen-req server nopass
    sudo ./easyrsa sign-req server server
During this process, when prompted, you will need to set a password and server username. Once signed, you should see this in the terminal:

Now that the server is setup, generate the Diffie-Hellman key exchange:
sudo openssl dhparam -out /etc/openvpn/dh.pem 2048
Your terminal should look something like this:

Now, you need to generate an HMAC signature for a strengthened control channel:
sudo openvpn --genkey secret /etc/openvpn/ta.key4. Server Configuration
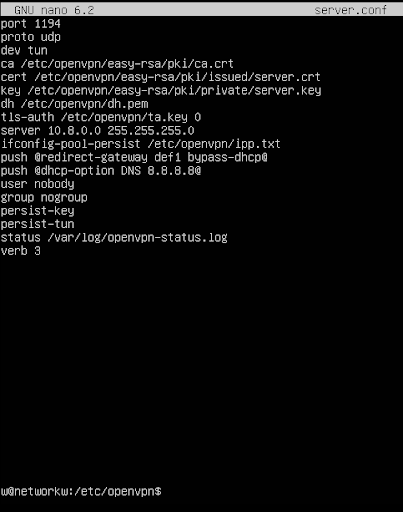
Create a server configuration file /etc/openvpn/server.conf and add the following lines:
port 1194
proto udp
dev tun
ca /etc/openvpn/easy-rsa/pki/ca.crt
cert /etc/openvpn/easy-rsa/pki/issued/server.crt
key /etc/openvpn/easy-rsa/pki/private/server.key
dh /etc/openvpn/dh.pem
tls-auth /etc/openvpn/ta.key 0
server 10.8.0.0 255.255.255.0
ifconfig-pool-persist /etc/openvpn/ipp.txt
push "redirect-gateway def1 bypass-dhcp"
push "dhcp-option DNS 8.8.8.8"
user nobody
group nogroup
persist-key
persist-tun
status /var/log/openvpn-status.log
verb 3
You can write files in the Linux terminal by utilizing Nano:
    cd /etc/openvpn/
    sudo nano server.conf
Enter the configuration file lines:

Then press “CTRL + O”, “ENTER,” then “CTRL + X” and the file will be saved.
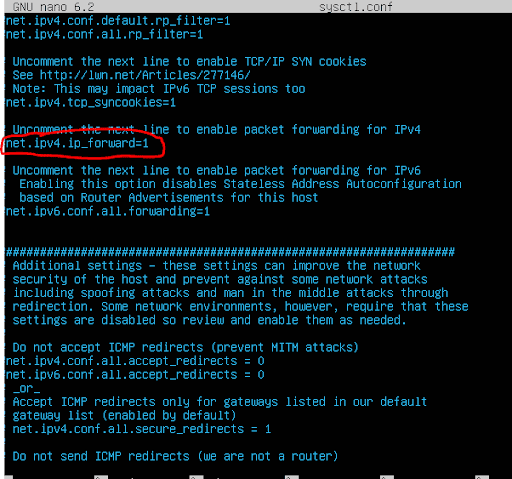
5. Enable IP Forwarding
Uncomment the following line in /etc/sysctl.conf to enable IP forwarding:

Activate the changes:
sudo sysctl -p6. Firewall Configuration
Configure the firewall to allow VPN traffic:
    sudo ufw allow 1194/udp
    sudo ufw allow OpenSSH
    sudo ufw enable
7. Client Configuration
Generate client keys:
    cd /usr/share/easy-rsa
    sudo ./easyrsa gen-req client nopass
    sudo ./easyrsa sign-req client client
During this process, you will again enter the username and use “user” as a placeholder. Once prompted, type the word ‘yes’ and enter the password we used earlier in step three for the server’s certificates and keys setup.
Finally, create a client configuration file named client.ovpn in /etc/openvpn/:
client
dev tun
proto udp
remote your_server_ip 1194
resolv-retry infinite
nobind
persist-key
persist-tun
key-direction 1
remote-cert-tls server
tls-auth ta.key 1
data-ciphers AES-256-GCM:AES-128-GCM
verb 3
Copy the client certificates and keys to your local machine.
8. Connecting to the VPN
Use OpenVPN on your local machine to connect to your VPN server:
openvpn --config client.ovpnAnd that’s how to make your own VPN.
Frequently Asked Questions
How do you create a VPN?
There are eight steps to create your own VPN:
- Set up the server
- Install OpenVPN and Easy-RSA
- Configure server certificates and keys
- Set up the server configuration.
- Enable IP forwarding
- Configure firewall
- Configure the client
- Connect to the VPN
What is a VPN?
A VPN is a privacy tool that disguises a user’s IP address and encrypts their data, allowing them to browse the internet without sharing personal data. It’s useful for those interested in protecting their data and as an extra security layer for businesses.


